Transistor Tester
Written by I.D.Macarthur, G3NUQ - Published in Radio Communication October 1970
As presented to the Vange Amateur Radio Society 16th Mar 2006, by Roy G3ASH
Most amateur users of transistors (and many professionals, too) would like a cheap, reliable and simple device to give a good/bad indication of the state of doubtful devices (often removed from a suspect circuit). The tester precented here is just such a device and enables, in addition, measurements and matching of β to be carried out.
With this device it is a simple matter to run through a box of assorted transistors, selecting good ones, sorting PNP/NPN types etc, and furthermore it is so simple that it has been successfully used by engineers with no previous instruction.
.....
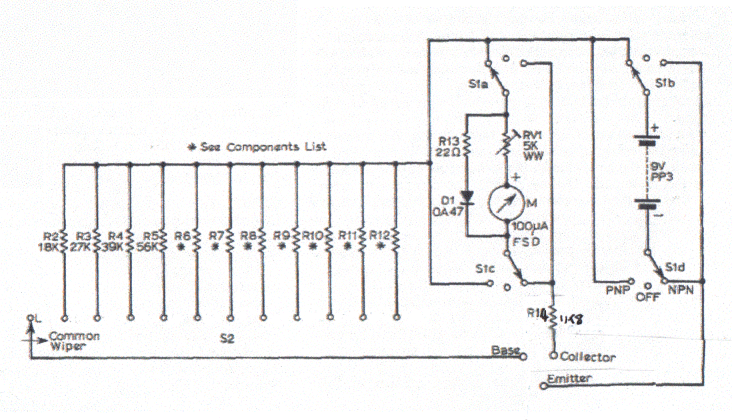
The Complete Circuit.
Figure 3 shows the complete circuit which includes the pnp-off-npn switching. The instrument is built in an Eddystone die-cast box, with grommets for rubber feet to avoid damage to the polished surface of the shack bench.
Connection to the transistor under test is made by croc-clips of the fine wire type on flying leads about 3in long.
This method of making connections is preferable to terminals or a transistor socket,
since it enables transistors with short leads, power transistors, diodes and rectifiers all to be tested easily.
The resistors R2 to R12 are made up by paralleling standard values as shown in the parts list, but if great accuracy is not required the nearest preferred value may be used.
It will be observed that the first position on S2 has no resistor; this position enables the leakage current ICEO to be measured.
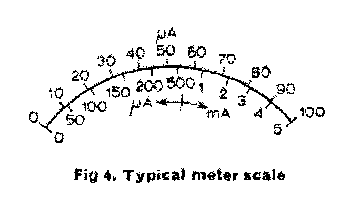
Calibration.
Calibration consists of two parts, (1) setting the full scale current in the meter, and (2) calibrating the meter in terms of collector current.
(1) Connect leads C and E together and adjust RV1 till the meter reads full scale, when S1 is in either the PNP or NPN positions.
(2) Connect a micro/milliameter in series with a 1MΩ potentiometer and connect between leads C and E,
Now, as the 1MΩ potentiometer is varied the current will vary, it's value being read on the test meter at suitable intervals.
The appearance of a typical meter scale is shown in Fig 4.
Operation
The transistor to be tested is connected to the leads E, B and C and S1 moved to NPN or PNP as appropriate.
With S2 fully anticlockwise the meter reads leakage current, which will be typically 100 to 400μA for a small germanium transistor and zero for a silicon one.
Then as S2 is moved clockwise the collector current will increase until a state is reached when the meter just reads full scale.
The position of S2 will now indicate the current gain.
Diodes can be tested by connecting the anode to C and the cathode to E, then with S1 at NPN the meter should read 5mA (if the diode is a good one).
With S1 at PNP the meter will read reverse diode current which shouls be negligible for a good diode.
This circuit was originally designed in the course of the author's work and the prototype has been in use for many years, often in preference to more sophisticated commercial equipment.
Several versions have been built, all giving excellent service.
Components list.
(N.B. The resistor values have been rationalised to utilise standard values)

RV1      5KΩ    Lin

                      Hfe
R2      18KΩ           10
R3      27KΩ           15
R4      39KΩ           20
R5      91KΩ           50
R6     130KΩ           75
R7     180KΩ          100
R8     220KΩ          125
R9     470KΩ          250
R10    910KΩ          500
R11     1M2Ω          750
R12     1M8Ω         1000

R13      22Ω
R14     1K8Ω

Case
Meter
Knobs 2
Press button
Rotary switch 1 pole 12 way
Rotary switch 4 pole  3 way
Diode OA47
Socket 4mm 3 (Red, White, Blue)
B7G base
Battery clip
Case fixing screws 4
B7G fixing screws and nuts - 2 of each
Clip fixing screw
Battery connector